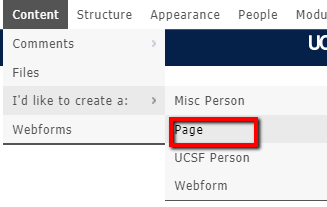
Admin Menu --> Hover over Content --> Hover over "I'd like to create a:" --> Choose 'Page.' (See image.)
Enter content of page according to the fields provided. THIS DOES NOT INCLUDE SIDE BAR, HEADER/FOOTER CONTENT. (See Blocks Basics.)
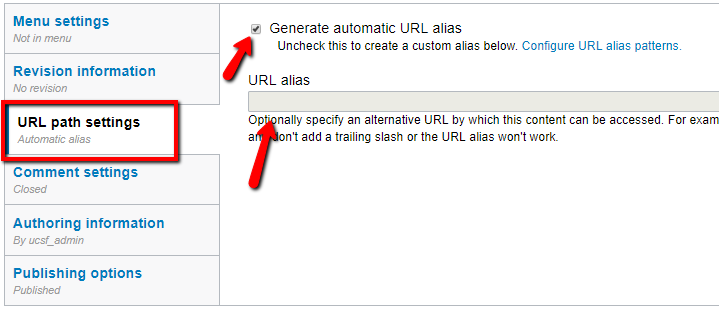
URL Path Settings - The site is automatically set to generate a breadcrumb that is based off of the title for this page. However, if a more specific breadcrumb is needed for the page, uncheck the 'Generate automatic URL..." box and enter the custom URL into the field. (See image.) Usually, Drupal breadcrumbs use a dash between words. For example, the breadcrumb for this content guide is /content/entry/guide.
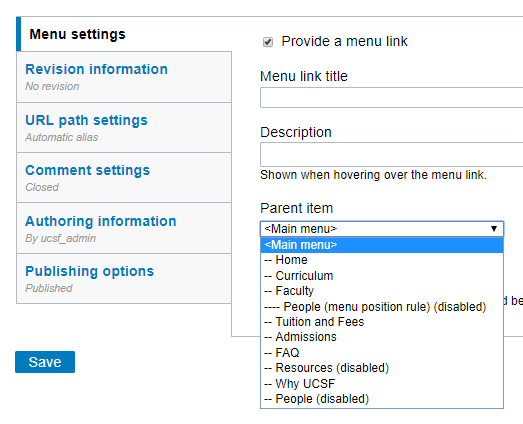
Menu Settings - If you'd like this page to appear in the main menu (or a child of an item in the menu, check the box called "Provide a menu link" in the Menu Settings tab. Parent item refers to where you want your link to appear immediately under.
WYSIWYG stands for: What You See Is What You Get. Each content field contains the WYSIWYG and should be used to create different text styles, sizes, etc.
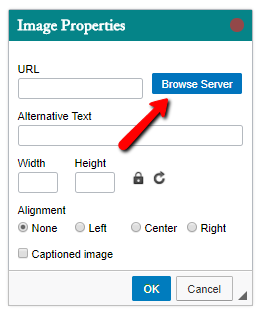
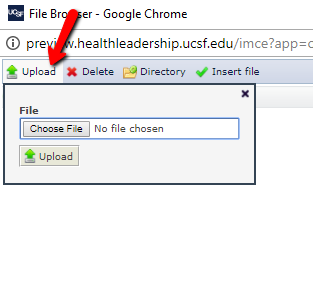
Upload Images - Click on the image icon in the WYSIYG. Then click on the button that's called "Browse Server" to open the site's image file system. Then, click on "Upload to display the upload field where you'll be allowed to choose an image file from your computer to upload to the site.
![]()
Source Icon - Reveals the raw HTML and CSS styles that is in the field.
Font Style Dropdown - Choose between paragraph and heading styles. First highlight text you'll want to style, then choose desired style in dropdown to implement.
Bold, Italic, Underline, Strikethrough, Remove Format, Superscript, Subscript, Align Left/Center/Right, Numbered, Bulletpoints, Indents - First highlight text, then click on an icon to implement.
Link - Internal path is to reference a page within the site. URL is to reference a page outside of the site. To have a link open in a new window, use the Tab window and choose "New Window." Note: No other option in that Target tab currently works in the UCSF Sie Builder template.
Anchor - Use this icon to drop anchors within the body of long text, then use the Link icon to reference the dropped anchors.
YouTube - Use Video embed icon to insert videos.
Paste from WORD - When pasting text from WORD, use either this icon or a notepad on your computer to strip the style from the text. (Not doing this can sometimes cause style issues within the WYSIWIG.
Gear - Allows you to style text in quote, featured style, or columns up to 3.
Line breaks vs. paragraph breaks - To create line breaks instead of paragraph breaks (WYSIWYG is set to paragraph breaks as default), simply hold down the shift key while employing the enter key.
Entering and Editing Faculty and Contributor profiles
Before entering any new Faculty/Contributor profiles, you'll need to check to see if the person exists in the UCSF Directory.
If the person exists in the directory, then Admin Menu --> Hover over "I'd like to create a:" --> Choose 'UCSF Person.'
Most of their information should already be populated from UCSF Profiles, though you'll still need to insert info to appear on the Faculty page. Insert info under "Profile Image,' 'Title Override' and 'Department Override.'
If the person doesn't exist in the directory, then Admin Menu --> "I'd like to create a:" --> Choose 'Misc Person.'
You'll need to populate all of the fields provided for this content type.
Faculty or Contributor - Idicate whether the person should appear under Faculty or Contributor list by type either "Faculty" or "Contributor" in the 'Person Type Extended' field.
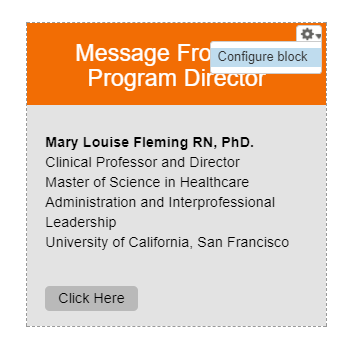
You can edit the content for most sideblocks and regions (aside from the main content of a page) bu simply finding the gear located at the top-right of each block and choosing "Configure block" then using the WYSIWYG to style the box. Please check the Source Code (source icon in WYSIWYG) to make sure you're not overwriting any style classes before you change anything.
You can use this method to edit the following blocks:
Message from Director
Program At a Glance
Accredited By
Header Boxes
Spotlight Boxes
Footer Links
You can not edit the Get Started Now webform using this method, so here is the direct link to the form - http://preview.healthleadership.ucsf.edu/node/5696/webform
Adding existing blocks to another page - To have a block appear on another page on the site, click on the gear of the block, choose 'Configure Block.' Then under the Visibility Settings (scroll to the bottom of the page), add the breadcrumb of the page you want the block to appear in the applicable field.
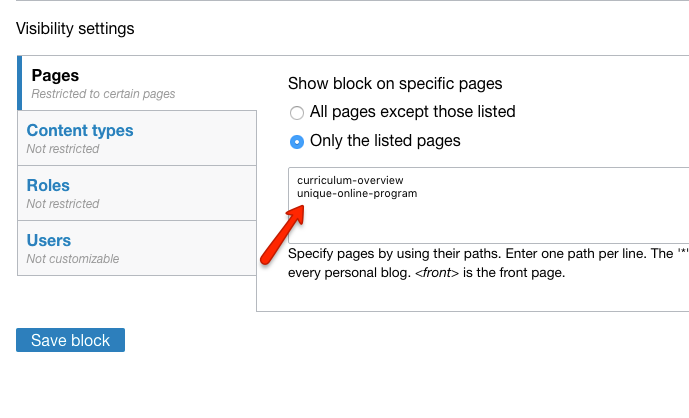
In summary: You do not need to create/duplicate blocks to have identical blocks on different pages. Just adjust the Visibility settings of that block.
Create a new block - In the Admin menu, hover over Structure --> Blocks --> Choose 'Add block.' Enter content as applicable. Adjust Visibility settings as needed for the page to appear where you want it to. DO NOT use the 'Add sidebar' link on separate pages to add a new block.
Reorder blocks - In the Admin menu, hover over Structure --> Choose 'Blocks.' (Here is the direct link - http://preview.healthleadership.ucsf.edu/admin/structure/block ) Note that all of the sidebar blocks are in the region called 'Sidebar - Top.' You can reorder these blocks to any revised order that's needed, keeping in mind to keep them in the same region to avoid breaking the style of each block.
To edit the order, spelling, or content of the items in the main menu, hover over the gear at the top-right of that region and choose 'List Links.'

To add new links - At the Menu links page ( http://preview.healthleadership.ucsf.edu/admin/structure/menu/manage/mai... ) click on 'Add link' and fill in the applicable information. After saving, drag and drop where you'd like your link to reside. NOTE: You can also add new links tot he menu when you create new pages on your site. (See 'New Pages' section.)
Admin Menu --> Hover and click on 'Content.'
Here, you'll see a list of all Pages, UCSF Persons, and Misc Persons that are on your site. Use the search filters to find specific content.
The CSS used to style the various custom-built blocks on the site (including the sidebar blocks and top info blocks, footer links and logo, etc.) is found here - http://preview.healthleadership.ucsf.edu/admin/config/development/css . You'll notice that all CSS styling is not found in the WYSIWYG, but referenced by class names and lives in this invisible block. DO NOT disable this block, keep it in the footer region of the site. Since technically we're not to push code to the Site Builder template using the normal developer workflow, this is the work around. You'll find common styles for the side blocks contained in this block. NOTE: UCSF ITS will be deploying a better solution for this soon. Our recommendation is to wait until this is rolled out onto your site instead of using this method.
http://dev.healthleadership.ucsf.edu This is the site to use when experimenting with new features and designs for the live site. No one sees this but us!
How to run a webform submission report
Go to - https://healthleadership.ucsf.edu/admin/content/webform
Click on the Submissions link, then click the Download link in the left menu - https://www.screencast.com/t/GTzGPjk8WFo Follow directions from there to download in the format needed.